

Wednesday, April 29, 2009
Blog Candy....
I came across Debbie's blog from clicking from another blog to another and so on. Have you ever done that before??? I do it pretty often and man the things you come across are pretty amazing. anyway back to the blog candy... Debbie is celebrating her Blogoversary and giving away some goodies and I just have to say these goodies are amazing and made my heart flutter... hehe A set of Copic Ciao markers, Spellbinders, stamps, ribbon and more... omg she had me at Copic. lol Check out her blog candy and her blog and find out what you have to do to win her blog candy...


Tuesday, April 28, 2009
"my secret garden" class...
I had so much fun working on this mini fence album from Genuinely Jane Studios for an upcoming class at Lila's Scrapbooking and more located in Everett, WA..
The class will be held on June 6th from 10:30 am-12:30pm. The cost will be $32.00 so if your local to me and want to learn some fun techniques and make this "my secret garden" picket fence album be sure to sign up as soon as you can as the class is limited.

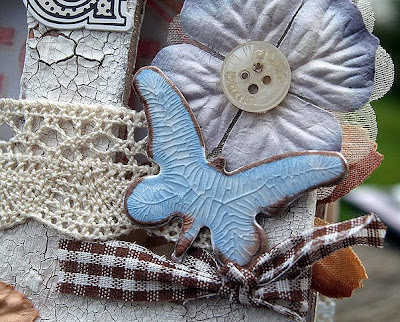


This album is full of Jenni Bowling New products and some amazing vintage items such as flowers, lace, ribbon, buttons and much much more. You will learn why Tim Holtz crackle paint is amazing and a must have and how to make sure it doesn't crackle off of your project. You will also learn and play with crackle accents and Glossy accents and trust me when I say you will fall in love with these products. Come on in to Lila's to see the entire album and sign up for the class.
Here is a very short list of things you will need to bring with you to the class.
The class will be held on June 6th from 10:30 am-12:30pm. The cost will be $32.00 so if your local to me and want to learn some fun techniques and make this "my secret garden" picket fence album be sure to sign up as soon as you can as the class is limited.


This album is full of Jenni Bowling New products and some amazing vintage items such as flowers, lace, ribbon, buttons and much much more. You will learn why Tim Holtz crackle paint is amazing and a must have and how to make sure it doesn't crackle off of your project. You will also learn and play with crackle accents and Glossy accents and trust me when I say you will fall in love with these products. Come on in to Lila's to see the entire album and sign up for the class.
Here is a very short list of things you will need to bring with you to the class.
- 3-4 photos that are at least 3x3 or smaller
- scissors
- your favorite brown ink pad (we will have a couple for the class to share)
- your favorite adhesive
- trimmer (really not needed unless you will need to trim your photos)
- Be ready to have some fun
Saturday, April 25, 2009
I just adore Lily Bee...
There are always new scrapbook companies popping up here and there and I just have to say Lily Bee has 2 amazing paper lines and I can't wait to see what the next release will be....
Here is a layout I did of a friend I scrap with... Her name is Katri (pronouced like Daughtry) don't ya just love her name... She is so fun to chat and scrap with and I love her down to earth attitude... She was showing me some photos on Monday and I just adored this one and asked if I could scrap it and of course she said yes...


Here is a layout I did of a friend I scrap with... Her name is Katri (pronouced like Daughtry) don't ya just love her name... She is so fun to chat and scrap with and I love her down to earth attitude... She was showing me some photos on Monday and I just adored this one and asked if I could scrap it and of course she said yes...


Products used:
Lily Bee "French Couture" pattern paper and Die Cuts
Kelly Panacci "Twit Twoo" Clear Stamps
Fancy Pants crochet flower
Kaiser crafts flowers and pearls
Dew Drops ink
Colorbok "my wild life" chipboard
Copic Cardinal red marker
Lily Bee "French Couture" pattern paper and Die Cuts
Kelly Panacci "Twit Twoo" Clear Stamps
Fancy Pants crochet flower
Kaiser crafts flowers and pearls
Dew Drops ink
Colorbok "my wild life" chipboard
Copic Cardinal red marker
Tuesday, April 21, 2009
Some news and more...
I got my goodie box from Simply handmade which was full of some great stuff, but the magazine is truly amazing... a lot of step by step projects and some totally cute projects...


Here is my Owl canvas with a fluttering butterfly... It has 4 more pages of step by step directions with a template so you can make your own...

Here is a close up of the project..
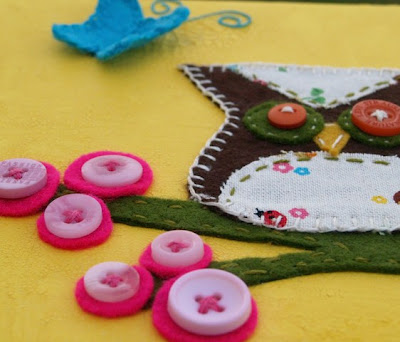
I do a lot of these canvas on consignment for nursery's and kids rooms in lots of different sizes... Here are a few more of the owl canvases that I do...


This one will be going up on Etsy soon


I also have a toot... I am now a "Cowgirl" I received a phone call at 9am on Saturday from Vennita at Purple Cows... Welcoming me to the Purple Cows design team... I am totally excited and so stoked to get some of there goodies to play with and use while I scrap everyday... hehe
Here is the announcement on the Purple Cows blog...
It has been a long month for a lot of very talented Designers, but the time has come….. we have chosen our winners! We want to thank all of you who entered. Every single one of you gave us beautiful pages and projects to look at. The lucky winners will be receiving some fantastic tools and products from or partners, and of course, they will be paid for their projects we publish for them. Since we loved everything that everyone sent, and because we want to make sure that everyone who entered our DT Call knows how much we appreciate their hard work and enthusiasm for Purple Cows, EVERYONE who submitted and entry will be receiving a prize!
But there were so many who entered, and only so many spots to fill. So without further ado, the winners are listed below, along with their geographical location. (In no particular order)
Cory Phillips – San Francisco
Cristal Pinky Hobbs - Nashville
Jing Jing Nickel – Twin Cities
Krysten NG – New York City
Robin Gibson – North Carolina
Samantha Sibbet – San Diego
Tanisha Long – Newark/Philadelphia
Elisa Kammerdiener - Seattle
Liana Suwandi – Dallas
Paula Nelson-Hart – Salt Lake City
Cecilly Hart – Provo
Vennita Wilson – Las Vegas
Lynn Warner - Illinois
***Special International Design Team Member***
Tommorow I will have a fun and super easy technique so be sure to check back here tomorrow...
Sunday, April 19, 2009
Heart Locket Album...
This album is one of the new Genuinely Jane Studios releases. I just adore it. I made it for my daughter for her to put her Adam Lambert photos in from American Idol... lol she just loved it.


Products used:
Genuinely Jane Studios Heart Locket wood album
Creative Imaginations "Marah Johnson" pattern papers and Rub-ons
Bazzill Cardstock
Cricut "Indie" cartridge
Glimmer mist "Gold"
Vintage glass glitter "red and gold"
Heidi Swap Flower
Prima gems
Helmar Adhesive
Thanks for looking.
Genuinely Jane Studios Heart Locket wood album
Creative Imaginations "Marah Johnson" pattern papers and Rub-ons
Bazzill Cardstock
Cricut "Indie" cartridge
Glimmer mist "Gold"
Vintage glass glitter "red and gold"
Heidi Swap Flower
Prima gems
Helmar Adhesive
Thanks for looking.
Saturday, April 18, 2009
New Moxxie...
I am just loving the new Moxxie May release... Loving that Liberty line... Love the look and feel of it and who can resist the Garden line....With fathers day around the corner that fishing line is a real catch... hehe


Coming to stores near you in May... If your liking what you see be sure to tell your LSS owners that ya want some of the new Moxxie...


Coming to stores near you in May... If your liking what you see be sure to tell your LSS owners that ya want some of the new Moxxie...
Wednesday, April 15, 2009
Wanna win a die cut machine???
Would you like the chance to win a die cut machine??? Simply handmade is giving not one but 2 away. They are giving away a Sizzix Big Shot and a QuicKutz Sihouette!!! Awesome right... All you have to do is respond to there give away post. You only have a couple of days to respond to there blog post HERE... The winners will be announced on Monday...
The magazine is awesome and if you happen to have the April/May issue turn to page 100 to see my project... hehe
Hugs
Elisa K
The magazine is awesome and if you happen to have the April/May issue turn to page 100 to see my project... hehe
Hugs
Elisa K
Tuesday, April 14, 2009
Technique Tuesday April 14th...
Today is Tuesday and that means time for another fun technique... This is one of my favorite techniques. I have used it a few times on layouts etc.
Items needed:
Chipboard pieces, die cut pieces or lace cardstock
White core cardstock such as DCWV, Core'dinations etc
sander
 Take your piece of cardstock and place it over your chipboard pieces.
Holding down firmly on your cardstock start to sand on top of your cardstock
 You will start to see your pattern showing up on your cardstock. The more you sand the more the white core will start to show your chipboard pieces that are placed under it.

When done brush off all the sanded cardstock and your cardstock will look very similar to the pattern you made with your chipboard pieces.

You can also do this with die cuts and even that awesome lace cardstock that cost $2 a sheet. This is a great way to get more out of that lace cardstock. It will NOT damage your lace cardstock, die cuts or chipboard.


I cut down my green piece of cardstock and used it as my "pattern paper" on my card.
This is my finished card. I hope you like the technique and will use it on your next project. Be sure to link me up so I can see how you used this technique...
We are going to make our own background paper, but you can do all kinds of things with this technique...
Items needed:
Chipboard pieces, die cut pieces or lace cardstock
White core cardstock such as DCWV, Core'dinations etc
sander
First you are going to want to place your chipboard pieces into a pattern or however you like.
 Take your piece of cardstock and place it over your chipboard pieces.
Holding down firmly on your cardstock start to sand on top of your cardstock
 You will start to see your pattern showing up on your cardstock. The more you sand the more the white core will start to show your chipboard pieces that are placed under it.
When done brush off all the sanded cardstock and your cardstock will look very similar to the pattern you made with your chipboard pieces.

You can also do this with die cuts and even that awesome lace cardstock that cost $2 a sheet. This is a great way to get more out of that lace cardstock. It will NOT damage your lace cardstock, die cuts or chipboard.


I cut down my green piece of cardstock and used it as my "pattern paper" on my card.
This is my finished card.
 I hope you like the technique and will use it on your next project. Be sure to link me up so I can see how you used this technique...
Saturday, April 11, 2009
Silk Colored Eggs....
Today was full of eggs.. I colored a dozen eggs using a silk scarf and the little guys and Miranda made rice crispy treat eggs. lol
Here are some photos of my eggs. I just love the way they turned out.


 To make eggs like this here are the things you will need...
Here are some photos of my eggs. I just love the way they turned out.


 To make eggs like this here are the things you will need...
raw eggs
Silk (silk ties and scarfs are great to use)
cotton sheet
warm water
vinegar
glass or enamal pan
I hope you like the eggs and if you make these please comment with a link to yours.
Silk (silk ties and scarfs are great to use)
cotton sheet
warm water
vinegar
glass or enamal pan
- You will need to cut your silk and cotton down to about 5x5 squares
- wrap a raw egg in silk with the silky side on the egg & tie ends with a scrap piece of cotton
- wrap you silk wrapped egg in cotton and tie ends with a scrap piece of cotton
- continue wrapping till all your eggs are wrapped
- place all your eggs in a glass or enamel pan
- fill your pan with warm water till it covers all your eggs
- add 3 tablespoons of vinegar to your pan
- boil your eggs for 20 min
- once boiled take them out to cool for a few min and then unwrap
- You can rub your eggs with a little cooking oil and then wipe with a paper towel for a shiny looking egg.
I hope you like the eggs and if you make these please comment with a link to yours.
Friday, April 10, 2009
Spring Cleaning...
So it's finally Spring and I just love Spring Cleaning... Really I do. Pack up all those winter clothes and take out those Spring ones etc. This month over at Serendipity they are doing a Spring Cleaning Contest... It's a great way to get all your scrappy stuff organized and purge some of it while your at it.
So one of the challenges is Paper... How do you store it? Do you like the way you store it? How is it organized etc etc...
So here is a photo of my paper storage... The first photo was taken a few months ago and My paper was a mess... My cropper hoppers had just pieces of this and that shoved in etc.


All my cardstock, chipboard and scraps are now stored in my Cropper Hoppers that sit on top of my white cabinet. My cardstock is all done by color.

So if you need to spring clean your scraproom head on over to Serendiptiy and do it one challenge at a time.
So one of the challenges is Paper... How do you store it? Do you like the way you store it? How is it organized etc etc...
So here is a photo of my paper storage... The first photo was taken a few months ago and My paper was a mess... My cropper hoppers had just pieces of this and that shoved in etc.

So yesterday a friend and I organized my papers alphabetically by Manufacturers. Yes I know I have a lot of paper. I also have one more of these paper racks that sits by my desk that has finished layouts in them as well as DT Kits and papers in them.

All my cardstock, chipboard and scraps are now stored in my Cropper Hoppers that sit on top of my white cabinet. My cardstock is all done by color.

So if you need to spring clean your scraproom head on over to Serendiptiy and do it one challenge at a time.
Tuesday, April 07, 2009
Technique Tuesday -- April 7th
I bet ya thought I forgot about my technique for today... I have been busy this morning and this is the first chance I got to post. I have also added a "followers" box to my sidebar. If you add yourself to the list it will let you know when I have updated my blog and it's easy for others to visit your blog...
Items you will need:
Clear Scraps Circle embellishments (or what ever shape you like)
Tim Holtz Ranger Adirondack Alcohol inks (I used the color lettuce)
Alcohol ink applicator
Ranger Adirondack Dimensional Pearls ( I used cranberry)
or Liquid Pearls
Stamp


Once dry your stamped image will look as if it was embossed on your piece of acrylic


This one is done with gold liquid pearls

 Remember you can click on each picture for a bigger view... In the supply list I have linked each item for you so you can see what other shapes or colors there are available.
I hope you will try this technique to emboss your Clear Scraps acrylic and other items. I would love to know what you thought of it and see your examples of your projects. It's really simple and gets you using some of those fun supplies you have.
So for my technique today I call it embossing without the heat...
Items you will need:
Clear Scraps Circle embellishments (or what ever shape you like)
Tim Holtz Ranger Adirondack Alcohol inks (I used the color lettuce)
Alcohol ink applicator
Ranger Adirondack Dimensional Pearls ( I used cranberry)
or Liquid Pearls
Stamp
Once you have all your supplies you want to take the coating off of ONE side of your Clear Scraps shape embellishment.
Take your alcohol ink and apply it to your felted tool and start dabbing your acrylic and let dry
Take your alcohol ink and apply it to your felted tool and start dabbing your acrylic and let dry

Once it's dry apply again and let dry and apply again. You are looking for the crackle glass look

Once you have that effect let it dry till it's no longer tacky...
Then flip your piece of acrylic over and take off the protective coating. ( I had you leave it on so you didn't get any ink on the other side.) Open up your dimensional pearls OR your liquid pearls which ever you have will work and put a nice amount onto a scrap piece of paper.
Then flip your piece of acrylic over and take off the protective coating. ( I had you leave it on so you didn't get any ink on the other side.) Open up your dimensional pearls OR your liquid pearls which ever you have will work and put a nice amount onto a scrap piece of paper.

Once you have the amount you want using your finger or paint brush and spread it out a bit.

Once you have done that take your stamp and press it lightly into the dimensional pearls several times at different angles picking up as much as you can without being gobbed on.
Then gently lay it down on top of your acrylic and press down firmly several times. (be sure to not let your stamp move.)
Then gently lay it down on top of your acrylic and press down firmly several times. (be sure to not let your stamp move.)

When you lift up your stamp the piece of acrylic will be stuck to your stamp. Do not pull it off just yet. Lay your stamp down on your table with the acrylic still attached to your stamp and press down on your acrylic a couple of times. Making sure you get as much as the dimensional pearls onto your acrylic.

Then holding down onto the stamp gently lift your piece of acrylic straight up off of your stamp.
Your piece of acrylic will now look like this
Your piece of acrylic will now look like this

put it aside and let it dry for about 10-15 min and get your card or layout ready for your "embossed acrylic"

Once dry your stamped image will look as if it was embossed on your piece of acrylic

Here are a couple of other samples I did with different colors.
This one is with pink liquid pearls
This one is with pink liquid pearls

This one is done with gold liquid pearls

Here is the card I made with my "embossed" Clear Scraps Acrylic
 Remember you can click on each picture for a bigger view... In the supply list I have linked each item for you so you can see what other shapes or colors there are available.
I hope you will try this technique to emboss your Clear Scraps acrylic and other items. I would love to know what you thought of it and see your examples of your projects. It's really simple and gets you using some of those fun supplies you have.
Subscribe to:
Posts (Atom)