Pages

Thursday, July 23, 2009

Today's Card

Today's Card is inspired by this weeks sketch at CPS. Be sure to hop on over there and see all the designers cards as well as everyone's cards who linked up this week.


Here is my take on the sketch...
Products used:
Purple Cows Ultimate trimmer
Purple Cows Perforated click blade 2802
Purple Cows short wave click blade 2803
Purple Cows straight click blade 2801
Clear Scraps 12x12 Clear Sheets
Hambly Overlays
My little shoebox mini alphas
Kaiser crafts "slit pea" rhinestones

Thanks for looking.


Pin It!

Tuesday, July 21, 2009

Playing with some goodies...

Well so far today my plans that I had didn't turn out so I am scrapping and playing with some goodies that I got in my Purple Cow DT box... That box or I should say boxes were packed with amazing goodies from some amazing sponsors. Today I pulled some product out of that box and was determined to get busy. hehe

Below is a card I created using this weeks 2 sketches 4 you card sketch by Kazan.


Products used:
Purple cows Ultimate Trimmer with Straight Rotary Blade, Perforating Click Blade , Short Wave Click Blade.
Dove of the East India Journey "Royal Mehndi & Cardamon" pattern papers
Dove of the East India Journey "Foreign Accents" clear stamps
Core'dinations Vintage Collection "Starry Night" cardstock
Core'dinations Essentials collection "Dandelion"
Color Box Chalk inks "Black Bird, Pumpkin Spice, Prussian Blue & Aquamarine"
The little shabby box "Rust" lace
Black embossing tape

Step by Step directions:
1. Trim Starry Night cardstock down to 5"x10".
2. Score at 5" and fold in half.
3. Ink the edges of your card with Prussian Blue and then go over it again with Aquamarine.
4. Using the Long wave click blade trim the bottom ends of your card.
5. Cut a strip of Royal Mehndi & Cardamon pattern papers down to 2 1/4"x12".
6. Cut down those strips to 2 1/4"x2 1/4" squares (You will only need 3 squares total).
7. Cut a strip of Core'dinations Dandelion cardstock down to 2 1/4"x12".
8. Cut dandelion strip down to 1 2 1/4"x2 1/4" square.
9. Using the Dove of the East India Journy clear stamps, Stamp with Pumpkin Spice on the Core'dinations square in any pattern you like.
10. Ink the endges of all 4 squares with Blackbird ink once dry adhere them.
11. Tie a bow around the center of the card with lace.
12. Add sentimate with embossing tape.

Here is another fun and simple card...


Products used:
Core'dinations Black Magic "wizard" cardstock
Dove of the East India Journey "Rajni's Pleasure & Palace Silk" pattern papers
Black Embossing Tape

Thanks for looking...

Pin It!

Sunday, July 19, 2009

Clear Scraps New goodies...

I am just in love with all the new Clear Scrap goodies but two of my favorite items is the Cog Chipboard Album and the Clear N Chip Carson's Park. The two of them make an amazing album and using the Scrap Within Reach "Industrial Park" collection You simply can't go wrong.


The new releases are simply amazing and if you visit the Clear Scraps Site you can see the entire new release and I will have more to show this week and you can also view all of the Clear Scraps designers blogs from my sidebar to see all there fab creations. Let us all know what you think of all the amazing new goodies from Clear Scraps and ya never know you just may get an e-mail from me asking for your addy to send you some awesome Clear Scraps goodies. hehe


Pin It!

Thursday, July 09, 2009

Ad This challenge and photoshop step by step

This weeks Ad at Ad This is a fun one... Challenge ends Saturday July 11th...


The twist this week is to change the color or colors of your photo or photos. Rather it be done in photo shop or by inking, painting, chalking etc.

Here is my take on the ad.


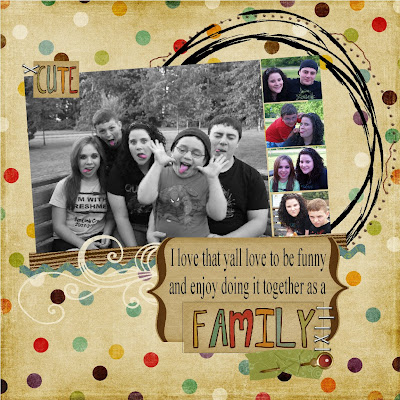
I changed one of my photos to black and white while keeping all of my kido's tongues red.

In photo shop elements here is the step by step.

  • Open your photo and go to layer and click on duplicate layer.
  • A box will open up asking to save as... You want to save as background copy.
  • Making sure your background copy is highlighted to the right you want to click on enhance and then adjust color and then click on remove color.
  • In your tool box that should be opened you will see an icon of an eraser. You want to click on the magic eraser and then move over to your photo and click where you want the original color to show through. Keep doing this until your photo is how you want it.
  • Once done you need to click on Layer and go down to flatten image.
  • Then save it
I also decided to do a digital layout since my computer was out of commission for a few weeks. I found this free "Happy go Lucky" digi kit at Shabby Princess. I also mixed in some embellishments from a free Scrap N Art Victorian kit "You don't say" by Angel Pruitt and a fun digital brush from 2 peas in a bucket Queen of Quirk "Give Freely Accents"

Thanks for looking and have a great day.

Pin It!

Thursday, July 02, 2009

Finally...

Wow I have to say when your computer breaks down I sooooooooo feel your pain... Mine died on me a few weeks ago and I had to get a few things replaced on it etc got it back and it was still not working right so back again it went and I finally got it back yesterday and I am soooooo stoked.. LOL I swear it has been a huge pain in the butt to be without it for so long but that's life and life tends to suck from time to time...

Lots of stuff happend while I was without my comp... lol Michele my stepdaughter moved in with us. So we have been switching rooms and moving kids from one room to another etc... Never any fun but it's been great pruging things and throwing things out. LOL Plus shopping for new beds etc.

Now on to some fun projects I did with the Amazing Altered kit from Serendipity Scrapbooks.


The kit is truly amazing and filled with papers from Prima (Adriane Looman) Hambly and Glitz and embellishments from Basic Grey, Prima and Glitz and the amazing dotted embossed cardstock from Bazzill. Plus the fun album from Bo bunny and more embellishments

Pin It!